


Crear un disco para Solaris 11
Santiago y Raúl probablemente no llevan en la furgoneta discos de Solaris 11. Además es complicado configurarlo y seguramente necesitarán ayuda.Si se trata de un nodo que ya tenía Solaris 11 lo que tienes que hacer es traerte el repositorio de main1:/incoming/Repo/RepoPCI/nombre_nodo.tar.gz
También están en fpciLXX:/home/pci/repositorio/
Una vez tienes el disco en la plataforma arrancado, destarea el repositorio como root en raíz (/ directorio padre)
No te olvides de configurar la UIS mediante el comando drpadmin.
Comprueba que no impida arrancar ningún proceso porque root se apropie de algún directorio de trabajo.
Dado que nunca ha habido que cambiar un disco de Solaris 11 por otro de la furgoneta no es descartable que haya que hacer lo que figura más abajo en la sección Configurar la red.
¿Qué pasa si se trata de un nodo que tenía una plataforma distinta a Solaris 11?.
Tienes que traerte el repositorio pero NO puedes destarearlo tal cual.
Lo único que puedes reemplazar tal cual sería el contenido de sistema/V del repositorio, así como la licencia /usr/local/pci/pci.
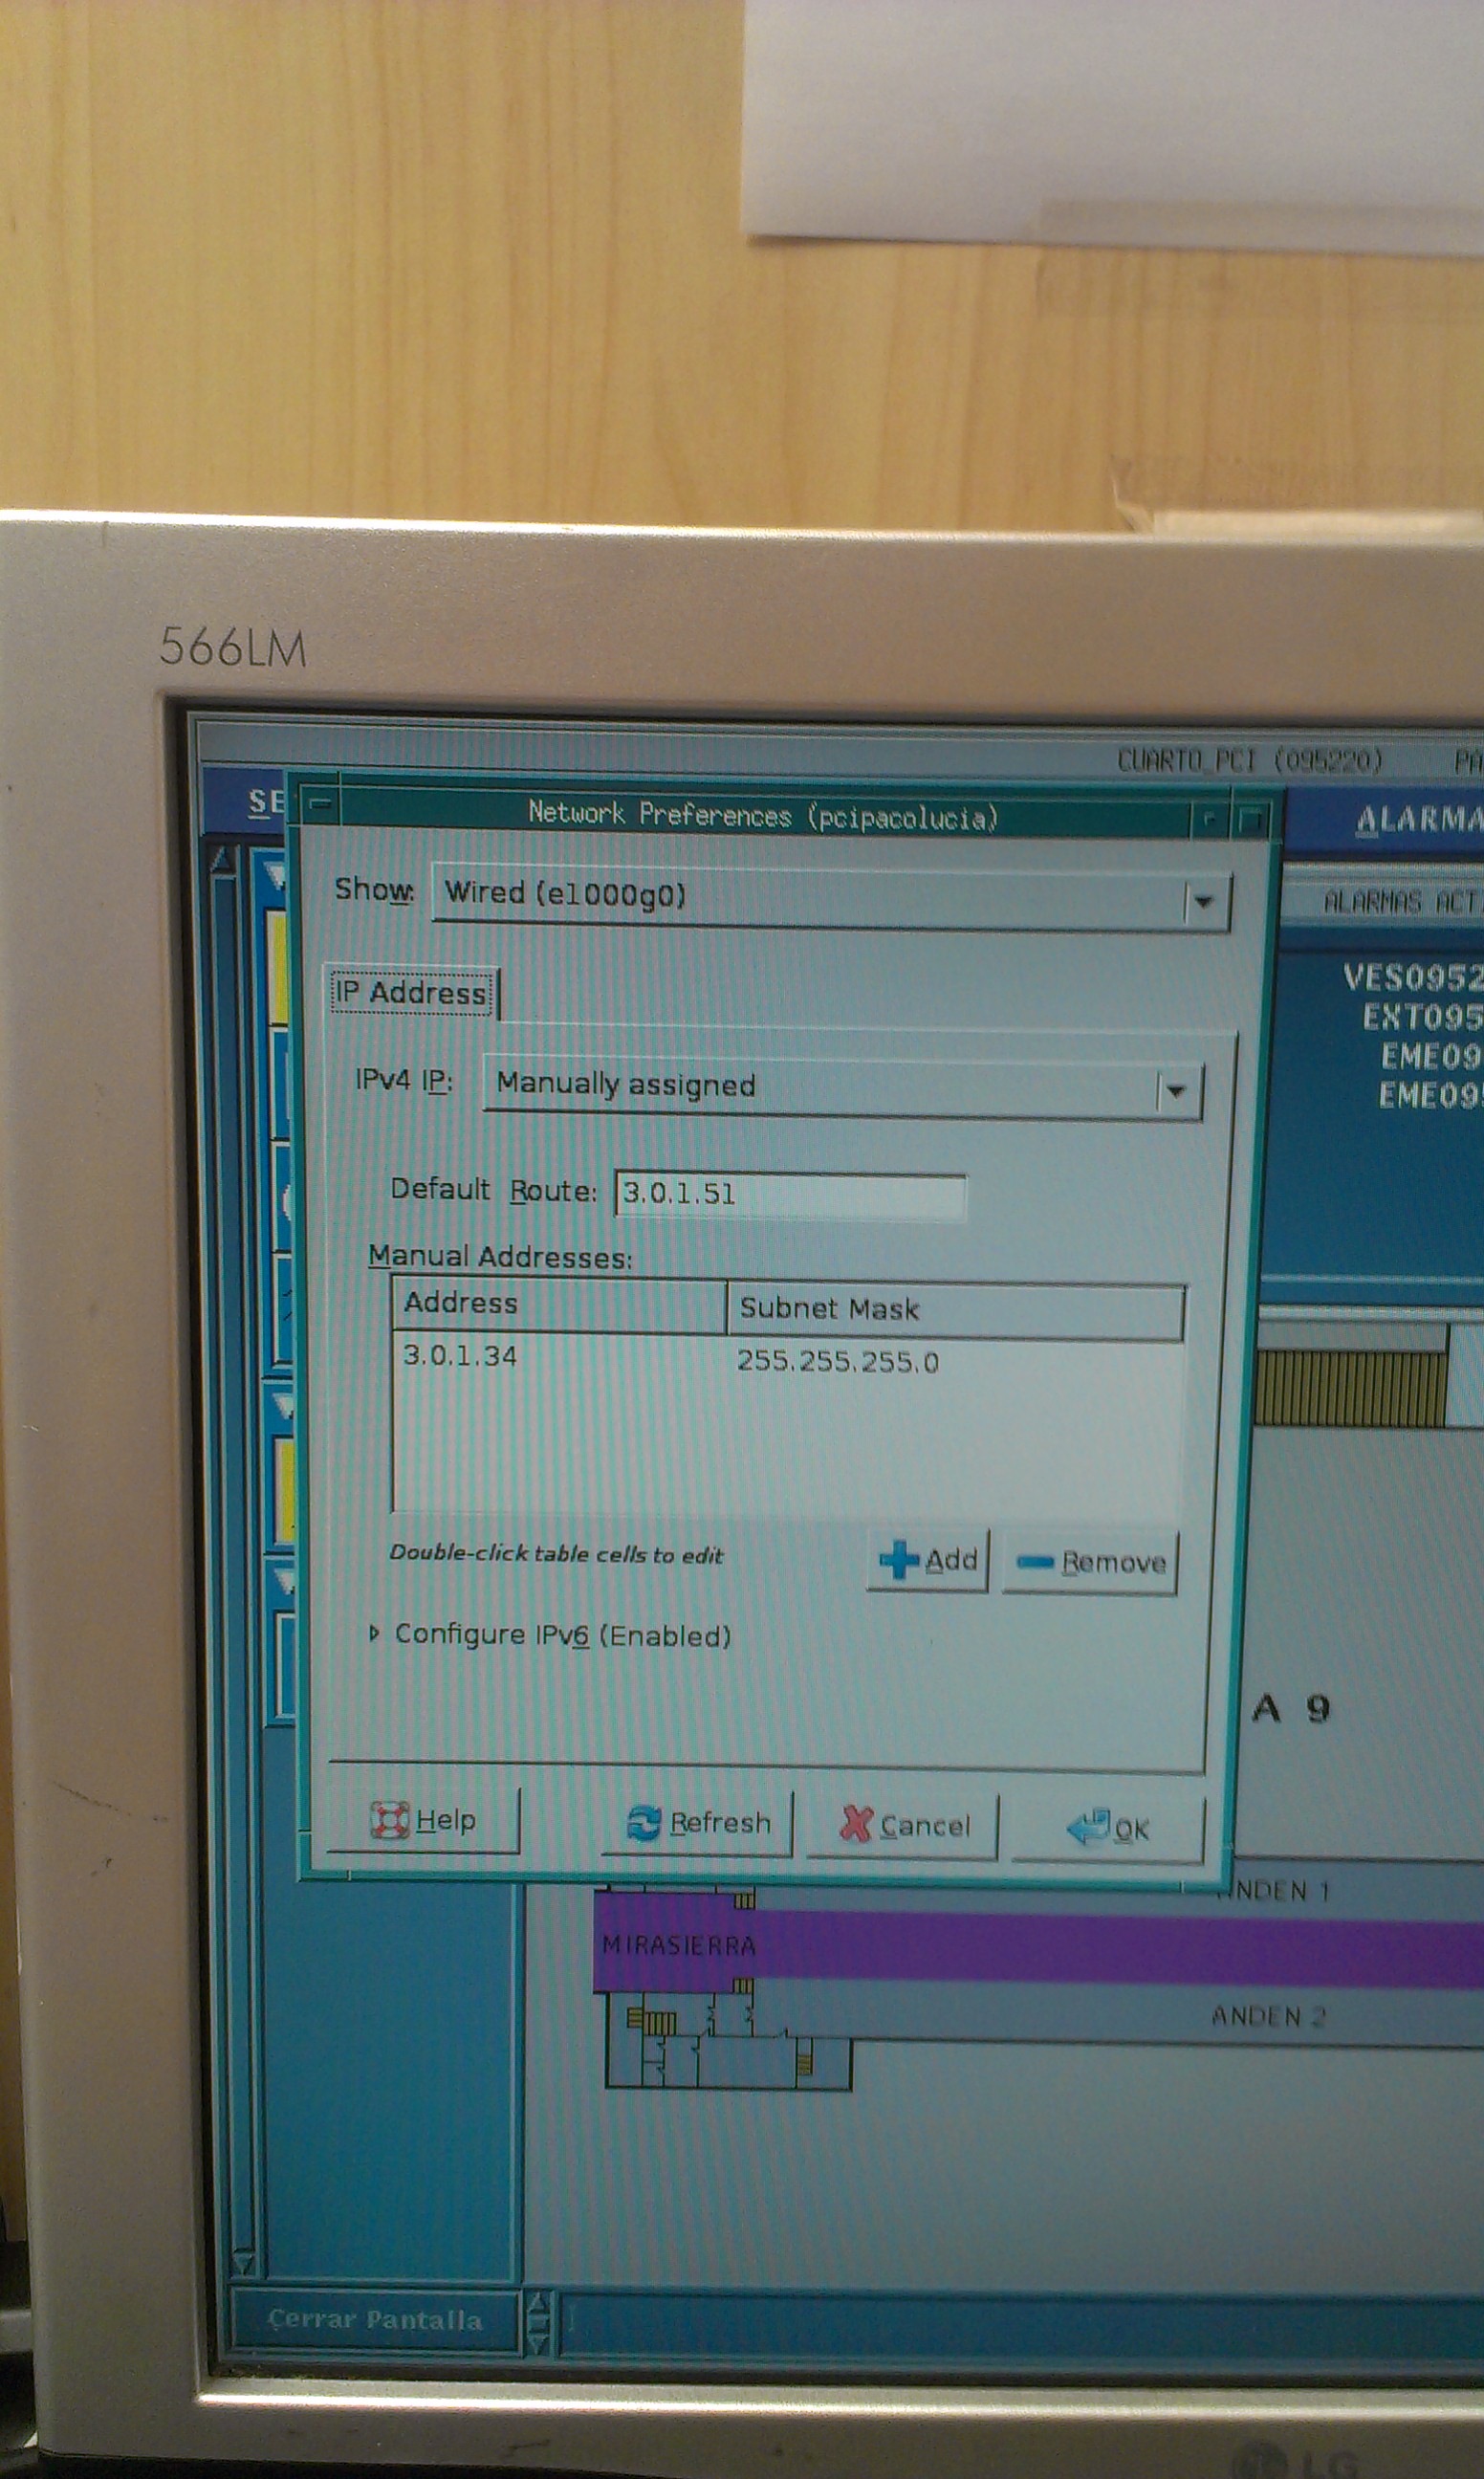
Configurar la red
Para configurar la red hay que arrancar el comando /usr/local/bin/cambia-ip.sh como root. Es muy probable que tengamos que exportar previamente el display a :0
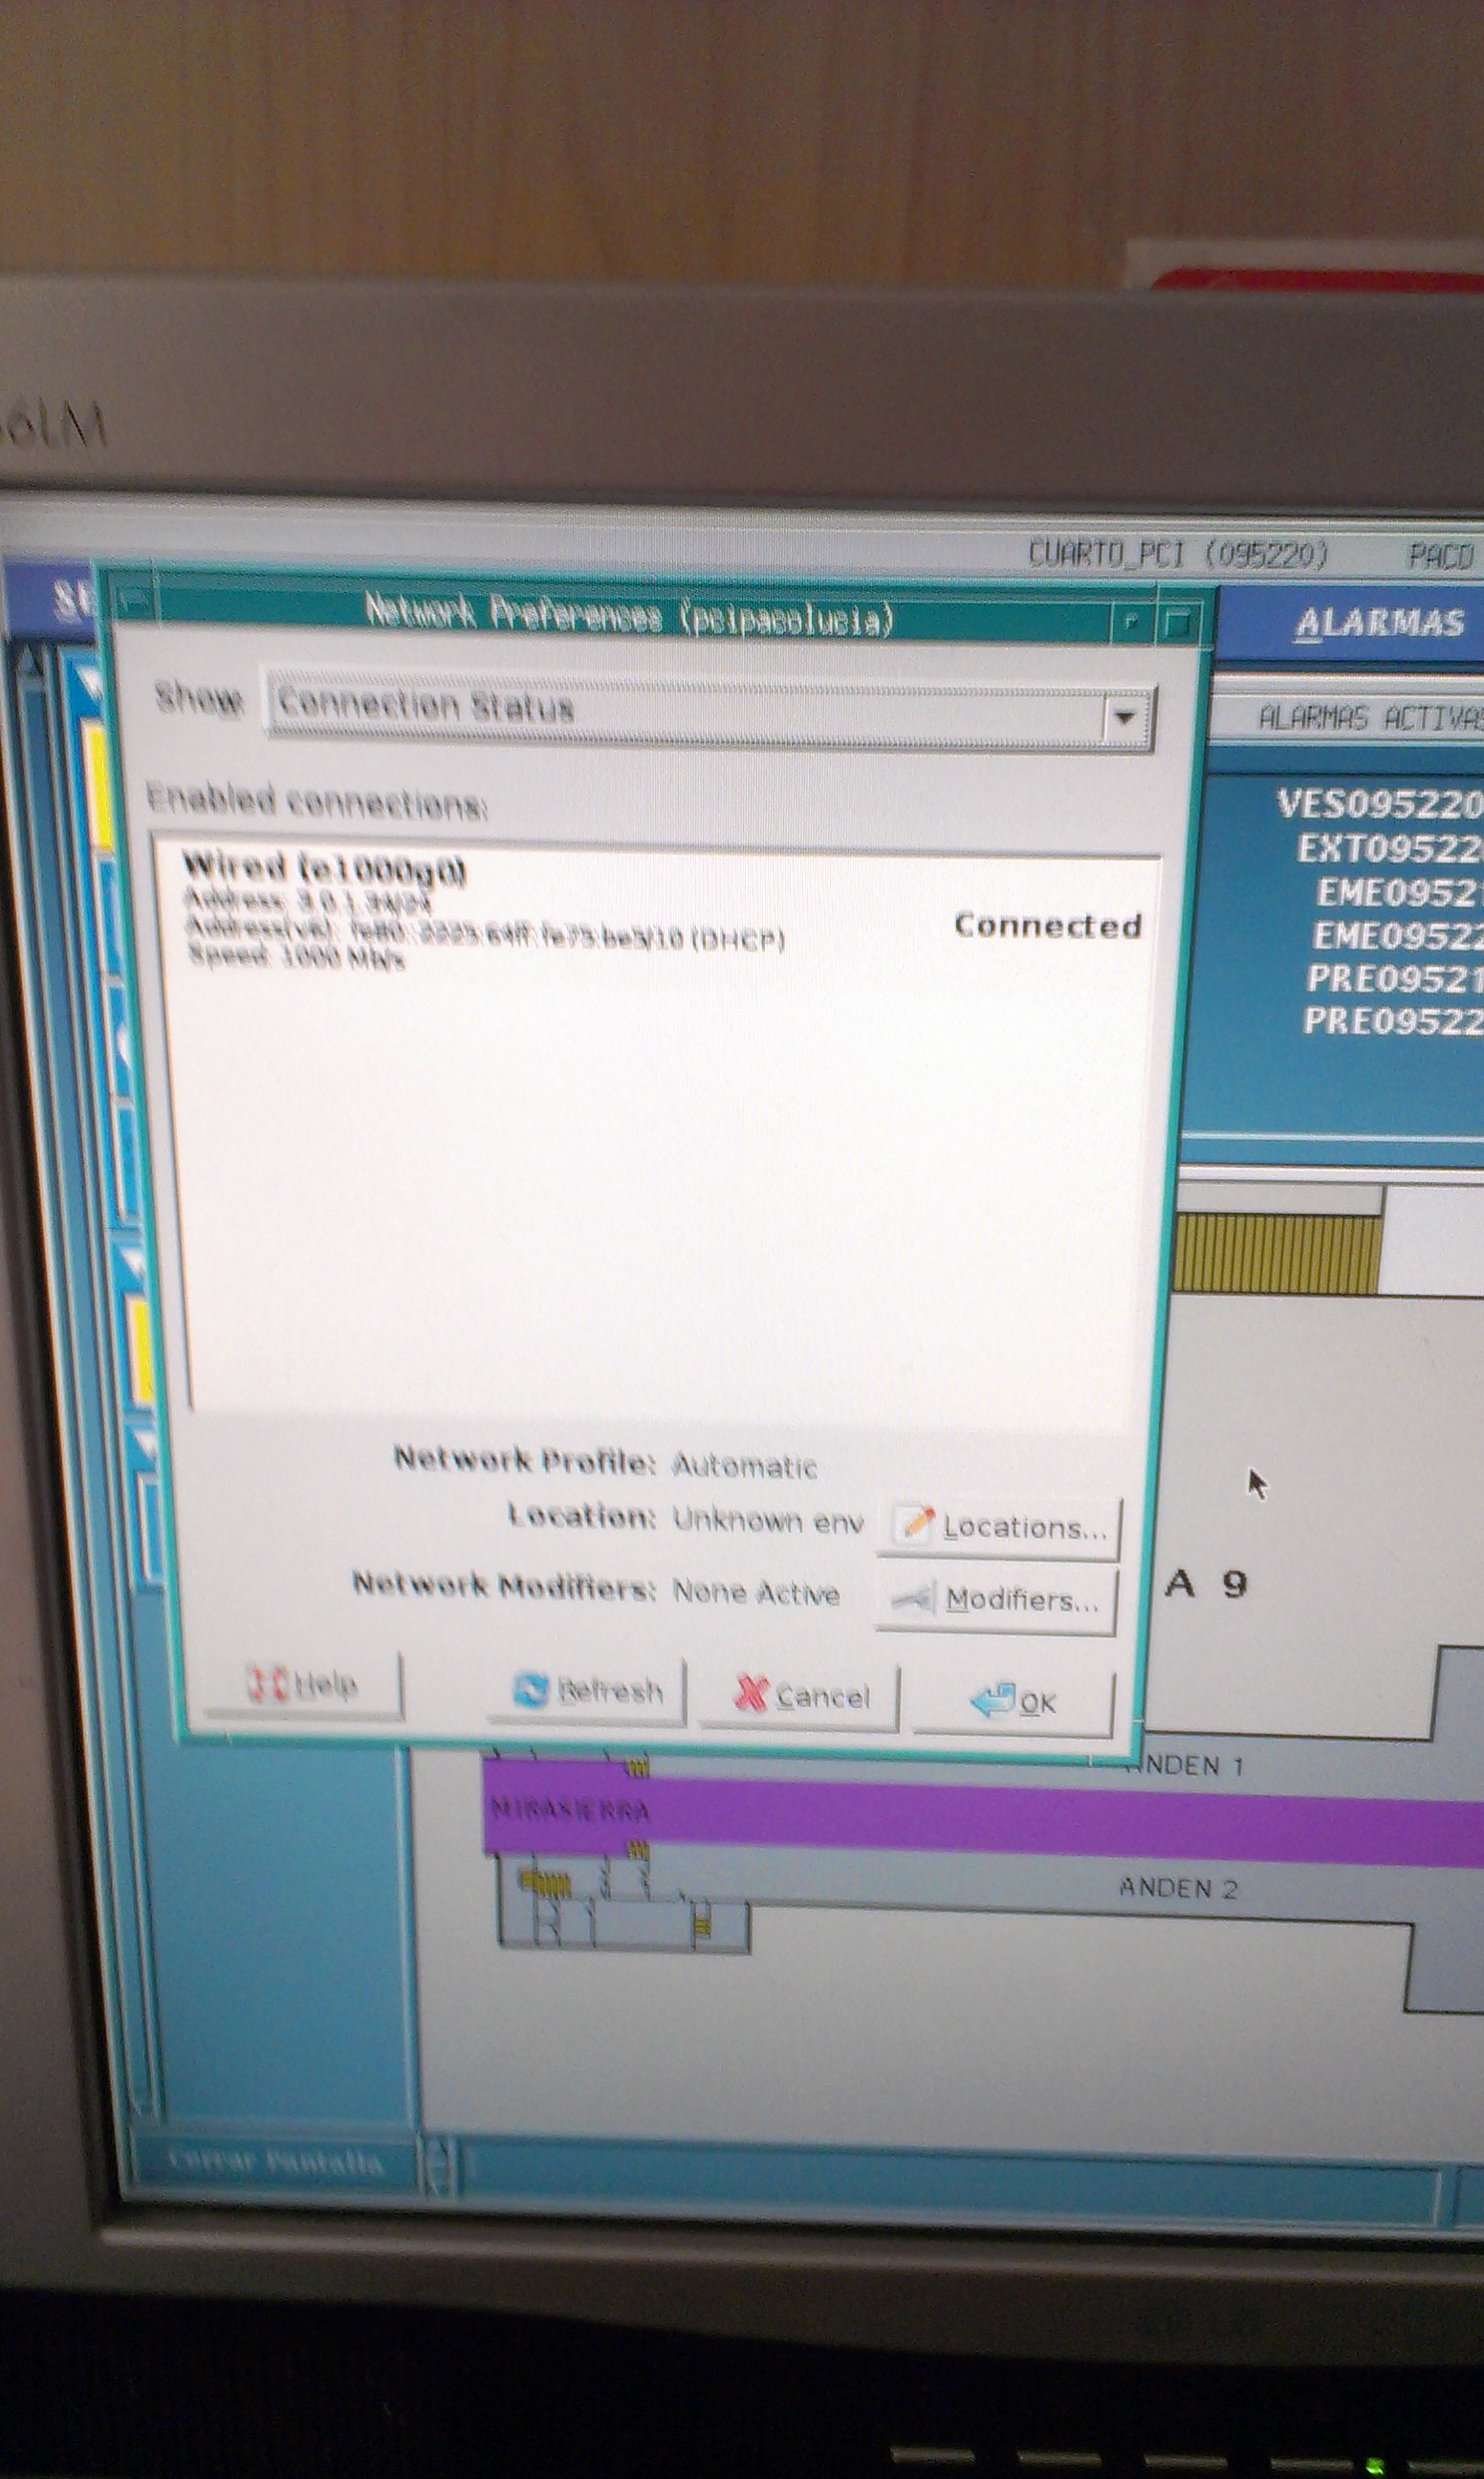
Se clica en wired 0 y se configura gateway, ip y mascara y se acepta. En IPv4 se elige configurar manualmente.
En default router se pone el gateway y luego se añade la nueva dirección para el pci más su máscara.
Luega ya se puede editar el /etc/hosts como root y copia las direcciones del hosts del repositorio. Hay diferencias entre los hosts de los diferentes sistemas operativos por lo que no puedes borrar tal cual el de Solaris 11 y pegar el del otro sistema operativo.
Lo mismo para /etc/services
Hay que modificar el contenido de /etc/nodename, /etc/dumpadm.conf para que tenga el nombre del nuevo nodo.
Hay que ir a /var/crash/ y cambiar el nombre del directorio del nodo que aparece
Seguidamente lanza
/usr/sbin/dumpadm -s /var/crash/nombre_nodo_nuevo
Configurar /etc/X11/xorg.conf
Si se trata de una placa en la que el ratón y el teclado van por el mismo PS2
- Error: this should not happenError: this should not happenError: this should not happenError: this should not happenError: this should not happenError: this should not happenError: this should not happenError: this should not happenError: this should not happenError: this should not happenError: this should not happenError: this should not happenError: this should not happenError: this should not happenError: this should not happenError: this should not happenError: this should not happenError: this should not happenError: this should not happenError: this should not happenError: this should not happenError: this should not happenError: this should not happenError: this should not happenError: this should not happenError: this should not happenError: this should not happenError: this should not happenError: this should not happenError: this should not happenError: this should not happenError: this should not happenError: this should not happenError: this should not happenError: this should not happen
- Core Pointer's InputDevice section
- Error: this should not happenError: this should not happenError: this should not happenError: this should not happenError: this should not happenError: this should not happenError: this should not happenError: this should not happenError: this should not happenError: this should not happenError: this should not happenError: this should not happenError: this should not happenError: this should not happenError: this should not happenError: this should not happenError: this should not happenError: this should not happenError: this should not happenError: this should not happenError: this should not happenError: this should not happenError: this should not happenError: this should not happenError: this should not happenError: this should not happenError: this should not happenError: this should not happenError: this should not happenError: this should not happenError: this should not happenError: this should not happenError: this should not happenError: this should not happenError: this should not happen
Identifier "Mouse1"
Driver "mouse"
Option "Protocol" "Auto" ---- Hay que escribir esto
Option "Device" "/dev/mouse" ---- Hay que escribir esto
EndSection
Si se trata de una placa en la que el ratón y el teclado van por distintos PS2
- Error: this should not happenError: this should not happenError: this should not happenError: this should not happenError: this should not happenError: this should not happenError: this should not happenError: this should not happenError: this should not happenError: this should not happenError: this should not happenError: this should not happenError: this should not happenError: this should not happenError: this should not happenError: this should not happenError: this should not happenError: this should not happenError: this should not happenError: this should not happenError: this should not happenError: this should not happenError: this should not happenError: this should not happenError: this should not happenError: this should not happenError: this should not happenError: this should not happenError: this should not happenError: this should not happenError: this should not happenError: this should not happenError: this should not happenError: this should not happenError: this should not happen
- Core Pointer's InputDevice section
- Error: this should not happenError: this should not happenError: this should not happenError: this should not happenError: this should not happenError: this should not happenError: this should not happenError: this should not happenError: this should not happenError: this should not happenError: this should not happenError: this should not happenError: this should not happenError: this should not happenError: this should not happenError: this should not happenError: this should not happenError: this should not happenError: this should not happenError: this should not happenError: this should not happenError: this should not happenError: this should not happenError: this should not happenError: this should not happenError: this should not happenError: this should not happenError: this should not happenError: this should not happenError: this should not happenError: this should not happenError: this should not happenError: this should not happenError: this should not happenError: this should not happen
Identifier "Mouse1"
Driver "mouse"
Option "Protocol" "PS/2" ---- Hay que escribir esto
Option "Device" "/dev/kdmouse" ---- Hay que escribir esto
EndSection
¿Qué hacer si hay una centralita Esser?
Si hay que hacer un nodo de la siguiente lista que sea Solaris 11
Consulta el listado aquí
hay que instalar el paquete del moxa si se trata de una centralita Esser serie - modbus.
Se halla en main1:/incoming/MoxaSolaris.tar.gz o en main1:/incoming/PCI/MoxaSolaris.tar.gz o en marina:/home/metro/main1:/incoming/MoxaSolaris.tar.gz
Llevátelo a / del nodo y descomprímelo y destaréalo como root.
La ip que has de editar figurará en el repositorio del nodo.
Si no estuviese y el proceso estuviese configurado como activo en el CfgEquipo.CFG búscala en
Nas:\Proyectos\2017\Integración Centralitas Esser y detectores\Solicitud Direccionamiento Estacion.xlsx y edita el fichero /etc/moxattyd.cf
Compara con otra estación de la lista para ver dónde has de tocar en dicho fichero.
En cualquier caso debes generar el ejecutable de la centralita Esser. En el listado viene un enlace a cada centralita y al final de la página figura un apartado sobre la compilación.
También has de llevarte el fichero /home/pci/sun/CapturarFicherosRepositorio.sh de otro nodo que tenga el mismo sistema operativo si hay moxa
Modificación del fichero de licencia
Tendrás que añadir en el fichero de licencia del PCI una línea para que soporte la nueva estación.
A continuación se muestra la siguiente línea como ejemplo para el nodo de la subestación de Lago
subpcilago 10 13 30 OPENINDIANA 1399 OPENINDIANA
Sigue todos los pasos necesario relacionado con la modificación de las licencias y guarda la nueva licencia en /usr/local/pci/
Nota: Santiago y Raul suelen llevar copias en la furgoneta. Sin embargo, pudiera haber habido cambios con posterioridad a la realización de la copia que está en la furgoneta.
No es lo habitual, sin embargo, si tienes dudas llévate el repositorio de main1:/incoming/Repo/RepoPCI/ al nodo donde se haya cambiado el disco y reemplaza al menos sistema/V. Tal vez también el hosts y el services.
Nota2: Una vez se haya instalado el equipo es necesario hacer desde main1 lo siguiente como usuario pci:
ssh pci@nodo "ls"
Si no lo permitiese o pidiera confirmación (yes/no) has de dar de alta en el fichero que indique (known_hosts). Debería ser /home/pci/.ssh/known_hosts
Fíjate en el texto que devuelve al ejecutar el comando.
Indicará una línea donde da el error.
Para editar el fichero has de ser root y montar la partición como lectura/escritura:
su (vh83jkh4)
mount -o remount,rw /home/
mount -o remount,rw /
Vuelve a ser usuario pci, edita el fichero eliminando la línea que decía el mensaje de error y vuelve a intentar el comando
ssh pci@nodo "ls"
Si diera fallo de nuevo repite la edición del fichero eliminando la línea que da problemas.
Al hacer de nuevo dicho comando ya no debería dar problemas.
Una vez hecho hazte root de nuevo y monta las particiones como solo lectura.
mount -o remount,ro /home/
mount -o remount,ro /
¿Por qué es necesario hacer esto?.
Si no se hace no se puede traer el repositorio a main1 desde la estación ya que al lanzar el scp para traer el fichero pregunta lo de (yes/no) y para eso no está preparado el script.
Última actualización: 31/07/2019